Using Left Over Beans (Green Beans and Garlic Butter)

This recipe is a tasty way to use up those left over green or runner beans or it can be made with fresh beans, just boil or steam them quickly beforehand. We quite often mis-judge how many beans will be needed for a main meal and this is a good way to make sure nothing goes to waste.

Sufficient for 3 – 5 people as a side dish, about 15 to 20 minutes to prepare including cooking time. Difficulty – very easy.

Ingredients

  • About 200 – 300g pre-cooked green beans. Runner beans can be used if need be but they do not give quite the same result. The beans should preferably be cut into about 75mm – 100mm ( 3″ to 4″) lengths.
  • 2 medium sized cloves of garlic, very finely chopped
  • 1 tablespoon olive oil
  • 25g (1 oz) butter- alternatively use another 2 tablespoons olive oil.
  • If the beans were not cooked with salt, use about 1/2 a teaspoon of salt.
  • A pinch of ground black pepper (optional)

Method

Heat the oil in a fairly large saucepan or saute pan, about 1l (2pints) capacity. When the oil is quite hot but not smoking, add the butter if used. Make sure that the butter has melted then add the salt if used. Add the chopped garlic and stir and fry until the garlic starts to brown a little.

Add the beans turn up the heat a little and continue to stir and saute the beans as quickly as possible without letting the beans burn or catch. When the beans are thoroughly heated through, pour the entire contents of the pan into a dish and serve straight away.

This dish can also be served cold. If serving this way it is only necessary to cook the garlic as described and then pour the garlic/oil/butter/salt/pepper mixture over the beans. Toss and mix well to make sure that all the beans are covered. Allow to cool before serving – good with salad.

Beans – Runner, Dwarf & French Climbing

French runner and Dwarf Beans

Beans!

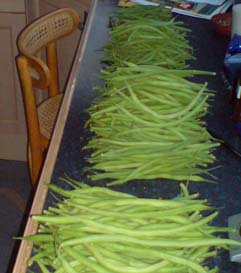
Today I picked 3.5lb (1.5Kg) runner beans, 2.5lb (1.25Kg) of dwarf French beans and 1.5lb (0.7Kg) of climbing French beans. Last week we picked about 10lb (4.5Kg) of beans of various descriptions, mostly dwarf French. The week before it was about 6lb (2.5Kg). I think that we have about the same amount still to come as well!

Updates:

  • 23/8/2010: Disaster, the wind blows over some of the climbing French beans! They may continue to grow as trailing beans?
  • 27/8/2010:  Runners 2.75 lb, dwarf 2lb and climbing French 8oz
  • 30/8/2010: Runners 2.25lb, dwarf 1lb 6oz and climbing French 1lb 4oz – yes they are still producing but only just!
  • 2/9/2010: Runners 1.5lb, dwarf 1.5lb and climbing French 1lb – lack of water affecting yield?
  • We picked the last of the beans yesterday, 16th October 2010, about 600g. We stopped weighing the crop some time ago.

The varieties that we grow are:

  • Runner Bean; Enorma, a traditional English variety, good to eat and freezes well
  • Dwarf Bean; Aguillon (a french variety bought in France), very tender and slow to go stringy
  • Climbing French Bean; Blue Lake, not a very large variety but gives lots of tender pods.

We try to make sure that we have a continuous supply from about mid/late-July when the dwarf beans start, through August when we pick mainly runner beans with the climbing French type coming to a peak late August and continuing into September.

Climbing French blown over

Fallen Beans!

We do not grow a vast quantity of any type, a 20′ (6m) double row row of runner beans, about the same of dwarf beans and about a 10′ (3m). the runner beans are sown as two lots with a 3 week interval so as to stagger the supply, the dwarf French as 5 lots at 2 week intervals and the climbing French as 2 lots with 3 weeks between.

We harvest runner beans when they are slightly under developed, this helps avoid some of the “stringiness” when cooked. Dwarf and climbing french beans are harvested at various stages of development, this allows us to optimise both yield and quality. Both of these types have the best flavour and quality when the are harvested young and immature but this does dramatically reduce the yield and the younger crop does not freeze well. As they mature they go through a phase where they have reached full length and are just beginning to swell. At this point you get the best compromise between quality, flavour and yield. Allow them to swell a little and the flavour begins to reduce but the yield rises, at this point on they are suitable for freezing. Finally when they are fully developed, although the yield is high and the crop will freeze well, the beans tend to be stringy and take much more preparation.

Bean Past Its Best

Break beans to check if ready

The best test as to the state of the crop is to take one or two and break them in half. If they are getting fat and break cleanly with no string then they are probably ready. If they break like the picture, then they are past their best and either eaten straight away after removing the string or thrown away in extreme cases.

Update 18th October 2010: we pulled up all the bean plants yesterday as the first frost had really damaged them and we would get no more beans. All the plants, including the roots, went on the compost heap. Traditional methods said to leave the roots together with the nitrogenous nodules in the ground. Modern theory is that most of the nitrogen has gone by this time of year.

Given the quantity that we harvest, we obviously cannot eat them all at once so we freeze as many as possible.

Freezing is easy provided that you have everything organised. First of all, sort the beans into heaps with beans of similar size. Then divide the heaps into easily manageable lots, around 0.5lb (250g) is good for us. Dice runner beans as you prefer, cut longer climbing and dwarf beans into easily manageable lengths, about 5 to 7cm (2 to 3″). Heat about 2 – 3  litres of water to boiling in a large pan, don’t be tempted to use too little water as you want the beans to blanche quickly, if there is too little water they will start to cook while heating. Prepare a large bowl with about 4 litres of cold water.

When the water is at a rolling boil, put in the beans and bring back to the boil quickly, leave boiling for 1 minute and then remove the beans quickly to the cold bowl. Leave them to cool for about 2 minutes, drain carefully and put into labelled freezer bags. Allow to cool completely and then put into the quick freeze compartment of the freezer.

We have successfully kept beans like this for over a year but 1 year should be your guide limit.

What ever you do, do not re-freeze defrosted beans or any other blanched produce once it has thawed.

Here is a recipe to help you appreciate the beans that you have grown, good as a side dish with curries and chinese meals:

Spiced Green Beans with Cashew Nuts

Tarka Dhal

Tarka Dhal is a lentil based dish frequently found on the menu in UK Indian restaurants. It is very easy to prepare but does take a little time in the cooking, about 45 minutes. It is normally served as a side dish but can form the basis of a full meal when served with rice or bread and another, preferably vegetable based dish.

The “Tarka” part of the name really refers to the “final fry” and not to any particular ingredient the recipe, this fry up adds a delightful smoothness and depth of flavour to what otherwise can be a relatively uninspiring dish.

The quantity below serves 4 to 6 as a side dish.

Ingredients:

  • 175g (6oz) red split lentils. Other pulses can be substituted but the cooking time and quantity of water will need to be adjusted.
  • 1l (1.75 pints) water
  • 2 or 3 thin (3mm) slices of ginger, bruised
  • 1/2 teaspoon turmeric
  • 1 teaspoon salt – adjust to taste
  • 4 tablespoons vegetable oil
  • 2 or 3 small dried red chillis (a pinch of chilli or cayenne powder can be substituted), adjust to taste
  • 1 rounded teaspoon of cumin seeds, as an alternative with slightly different flavours you can try black mustard seeds (fry until they pop) or fennel seeds (sizzle as for cumin)
  • 2 large cloves garlic, very finely chopped, adjust quantity for size of garlic cloves – as an alternative, if you have it, try a large pinch of asafoetida
  • 1 heaped tablespoon of chopped fresh coriander leaves (optional)

Method:

Wash the lentils and pick them over to remove any debris or small pieces of stone (not uncommon). Please the lentils, water, ginger and turmeric into a largish heavy pan, stir one or twice to mix in the turmeric and bring to a boil. Take care not to let the mixture boil over or let the lentils stick to the bottom of the pan. Reduce the heat and partially cover, allow the mixture to simmer very gently for about 15 to 20 minutes until the lentils soften and change colour to yellow. If necessary, add a little more water , the objective is to get a slightly thick consistency, not too runny.

Add the salt and stir, remove the mixture from the heat.

Heat the oil in a mall frying pan. We keep one especially for this process as the oil needs to be very hot, almost smoking. Add the chillis, cumin seeds and fry for a moment or two until the seeds begin to take on colour (if using mustard seeds, fry until they start popping), add the garlic and continue to fry until the garlic starts browning.

At this point you must be very careful as the next stage can be quite dangerous as hot oil tends to splash.

Remove the cover form the lentils and immediately add the hot spiced oil to the lentils. Cover the pan immediately, leave to stand for a few minutes.

Gently re-heat if necessary. If garnishing with chopped coriander, add this, stir one or twice and re-cover the pan.

Serving Suggestion:

Serve with practically any Indian meat or vegetarian dish and rice or bread.

Tarka Dhal can benefit from being prepared in advance and kept in the fridge overnight or even frozen for longer periods. If you do this, do not add the chopped coriander until you re-heat the dish just before serving.

Kuttu – Curried Vegetables with Lentils

Kuttu is a vegetarian dish originating from Southern India. It is another example of a relatively easy to make curry dish that can use vegetables commonly grown in the UK.

This recipe is intended to be served with rice as a main course as the basis of a complete meal or as a starter for a slightly larger number of people.

The quantities here are sufficient for 4 to 6 people as a side dish or starter, 4 maximum as a main course. Adjust the number of dried red chillis in the final fry to taste, two gives a moderate heat, three or more can be quite hot. Start with one or two small ones if in doubt.

Preparation and cooking time about 45 minutes or less. Difficulty – easy!

Ingredients

  • 750ml water (25 fl oz)
  • 500g (1lb) of vegetables, chose from peppers, green or runner beans, peas, cauliflower, broccoli, carrots, courgettes, aubergines, onions, pumpkin or similar. Potatoes and tomatoes are not really suitable but we have occasionally used them. Leaf vegetables such as spinach or cabbage do not work well although white cabbage sliced thickly is ok. If you want to experiment, try adding a banana.
  • 125g (4.5 oz) red Lentils
  • 30ml (2 tablespoons) cooking oil, if you have it, use peanut oil
  • 1 teaspoon of cumin seeds
  • 25g (1oz) of desiccated coconut
  • 2 slices of ginger about 2mm thick (optional)
  • 2 – 4 fresh or frozen green chillis remove the seeds for a milder dish
  • 1 teaspoon of salt – adjust to taste
  • 1 or 2 tablespoons of tamarind, lemon or lime juice (optional)
  • 2 tablespoons finely chopped coriander (or perhaps parsley) as a garnish (optional)

For the spice fry:

  • 2 tablespoons vegetable oil, again, if you have peanut oil, use this
  • 2 whole dried red chillis, adjust quantity to taste
  • 4 – 6 curry leaves, the larger the quantity, the stronger the flavour
  • 1/2 teaspoon mustard seeds
  • A pinch (1/4 teaspoon) of ground asafoetida. Note that the small jars sold in some supermarkets are not pure and have been heavily diluted with turmeric and possibly ground rice. If you have this type then increase the quantity. If you cannot get any at all, use a crushed clove of garlic.

Method

First wash, pick over and cook the lentils in 500ml of the water together with the turmeric and ginger if used in a large pan. Bring to the boil carefully and do not cover as they quite often attempt to boil over. Reduce heat to a simmer and cover carefully, cook until the lentils “bloom”, i.e. they become soft and expand. Make sure that they do not stick to the pan. Lentil cooking time is usually about 15 minutes.

Wash, prepare and cut the vegetables into pieces about 1cm (1/2″) cube.

In another pan, heat 2 tablespoons of oil and when hot add cumin seeds and desiccated coconut. Fry gently until the coconut starts taking on a light brown colour.

Now add the vegetables and the water taking care that the hot oil does not splash. Add the vegetables in the order of cooking time, longest first. Add the salt.

Cook, covered, gently until the vegetables are just under cooked by about 5 minutes – you have to judge.

Add the lentils and carry on cooking gently, stirring occasionally.

While the vegetables are in the final stages of cooking, heat the remaining 2 tablespoons of oil in a frying pan until fairly hot, almost smoking. Add the mustard seeds, asafoetida (or garlic) and dried chillis. When the mustard seeds start to pop, turn off the heat and quickly pour the fried mixture over the lentil and vegetables taking great care not to get splashed with the hot oil. Stir once, cover the pan and turn off the heat.

Stir in the tamarind, lemon or lime juice just before serving if used.

Add the coriander garnish if used.

Serving Suggestion:

This dish is substantial enough to form the main part of a meal. Serve together with rice or bread. It can also be served as a side dish or starter.

Kuttu should not be frozen. It can be prepared in advance but does not keep well for long. It should be kept in a fridge if not served immediately.

Aviyal – Vegetables & Coconut

At this time of year (August) we have a large surplus of vegetables and try to enforce a regime of one completely vegetarian main mean a week. This not only helps to use up the surplus but also improves our diet!

This recipe is intended to be served on the side accompanying a more substantial dish and rice as a main course.

Aviyal is a traditional Southern Indian dish that is often associated with religious occasions. The quantities here are sufficient for 4 to 6 people as a side dish. Adjust the amount of chilli to taste, 2 of Jalapeno type gives a fairly mild dish, 3 or more begins to be quite hot and sharp.

Preparation and cooking time about 45 minutes or less. Difficulty – easy!

Ingredients

  • About 180ml water (6 fl oz)
  • 500g (1lb) of vegetables, chose from potatoes, peppers, green or runner beans, cauliflower, carrots, courgettes, aubergines or similar. Tomatoes are not really suitable but we have occasionally used them. Leafe vegetables such as spinach or cabbage do not work well.
  • 4 tablespoons of desiccated coconut
  • 2 large or 3 medium cloves of garlic
  • 1 rounded teaspoon of chopped fresh ginger (optional, increases heat)
  • 2 – 4 fresh or frozen green chillis remove the seeds for a milder dish
  • 1 teaspoon of cumin seeds
  • 1 teaspoon of salt, some may prefer slightly more
  • Juice of half a fresh lime or 30ml preserved lime juice
  • 4 curry leaves, these quite often arrive as broken pieces so you will need to judge the amount
  • 150g (5 fl oz) fresh greek yogurt

Method

Wash, prepare and cut the vegetables into bite sized pieces.

De-seed the chillis if required and put them into a blender (or mortar and pestle if you need the exercise) together with the garlic, ginger (if used), coconut, cumin seeds and salt together with 1 teaspoon of water, blend until you have a smooth paste.

Beat the yogurt until it is of a fairly even thick consistency.

Bring the water to a rolling boil in a fairly substantial saucepan that has plenty of room to spare. Put the vegetables into the pan one at a time, starting with those that take the longest to cook (usually potatoes) and progressing through to those that take the least time, e.g. fine green beans. Keep the mixture simmering continuous throughout the period. Stir occasionally. When all are added, cover and allow to cook until they are just under cooked by about 5 minutes.

Add the paste mixture,  lime juice and the curry leaves, stir gently to mix and remove from the heat. Allow to cool for a few minutes then slowly add the yogurt  whilst stirring gently, the objective being to stop the yogurt curdling.

Put the pan back on a low heat and continue to cook gently, stirring frequently, until the vegetables are completely cooked.

Serving Suggestion:

This dish is designed to be served hot with a more substantial component to the meal such as a bean based dish such as black eyed beans and mushrooms together with rice or bread.

If you want to serve it as the manin part of a meal, try garnishing with sliced boiled egg and chopped coriander.

Aviyal, like many dishes of this type, does not freeze well and should be kept in a fridge if not served immediately.

Welcome to the oliver1.co.uk food blog

Welcome! We hope that you find these pages useful.

These pages are intended as a resource for everyone who enjoys good food, growing vegetables and developing their skills. Many more people are “growing their own” even if they only have a small garden and we hope that we will be able to pass on our knowledge and experiences, good and bad, for the benefit of all.

We will be presenting recipes, particularly those that use home grown produce and will attempt to present them in the season that they will be abundant. Occasionally we will pass on a recipe that uses some more exotic ingredients when we have found it particularly tasty. Some of the recipes and techniques will be presented as “under development” and we hope that your feedback will help us bring them to fruition. You can send us a message using the comment facility in each page. Bouquets and brickbats equally welcome when deserved!

Our philosophy:

  • We are not wholly organic.
  • We will occasionally use “safe” sprays to help control disease and infestation but will use them as sparingly and infrequently as possible.
  • We will only use chemical fertiliser (e.g. Growmore) if really necessary.
  • We will attempt to improve our (heavy clay) soil as much as possible using compost and manure.
  • We will grow as much as possible from seed, i.e. not purchase ready grown plants from garden centres.
  • We will use cloches and other protection to extend the seasons as far as possible.

We hope that you will enjoy following us on our journey,

JohnO